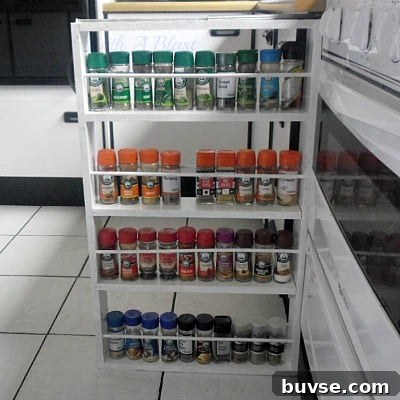
Build a sliding spice rack to keep all your dried herbs and spices neatly organized and within easy reach — a simple DIY project with clear steps and practical tips.
I had been meaning to create a dedicated spice organizer for a long time. Spice bottles had been shuffled between a cabinet, lined up along a counter, and tucked back into storage again. Finding the right jar when I was cooking was always inconvenient. When we recently rearranged the kitchen corner, a narrow gap appeared between the gas stove and the base cabinets. It was the perfect spot for a slim, pull-out spice rack.
How to make a Sliding Spice Rack
Measure the gap carefully before you begin. For my rack, I used White Melamine cut to size at a local building supply store. The pieces I had cut were:
- 5 pieces at 468mm x 90mm x 16mm
- 2 pieces at 840mm x 90mm x 16mm
These panels formed the shelves and sides of the rack. The design is straightforward: create a narrow shelving unit that fits the gap, add a couple of dowel rods on each shelf to hold bottles in place, and attach sliding hardware so the entire unit can be pulled out when needed.
Materials and basic tools used:
- Melamine or plywood cut to size
- Dowel sticks for bottle retention
- Drawer-slide or cabinet sliding hardware (mounted top and bottom)
- Paint for finishing exposed edges
- Small handle for easy pull-out
- Screws, wood glue, drill and screwdriver, measuring tape
Assembly notes: attach the side panels to the shelves, position dowel sticks across the front edge of each shelf so bottles stay visible but won’t tip forward, and sand or seal any exposed cut edges before painting. I painted the visible wood parts white for a clean look that matches the surrounding cabinetry.
The sliding system is installed with one piece mounted to the top of the rack and the mating piece fixed under the countertop. This allows the rack to glide in and out smoothly so you can access spices without bending or reaching into a deep cabinet.
Sliding Spice Rack (DIY)
The finished unit provides space for at least 40 standard-sized spice or herb bottles, keeping them organized and easily visible. Because it sits between the gas stove and the cabinets, it places spices within arm’s reach of both cooking areas. There is only a very slight gap between the bottom of the rack and the floor, which keeps it tidy without interfering with cleaning.
Construction took less than two hours once the panels were cut to size: assembly, painting, and mounting the slides. If you plan the cuts and gather your materials in advance, the build is quick and beginner-friendly. Customize the shelf spacing and depth to match your spice bottle dimensions, and consider labeling or arranging bottles by frequency of use to optimize convenience.
Tips for a durable, attractive result:
- Have the boards cut professionally if you don’t have a table saw—this saves time and ensures straight edges.
- Seal or paint exposed melamine cuts to protect them from moisture and give a finished appearance.
- Use soft-close or full-extension slides if you want smoother operation or greater reach into the unit.
- Test the fit with a few bottles before final assembly to confirm shelf height and dowel placement.
- Attach a small, comfortable handle centered on the front for easy access.
This simple sliding spice rack is a practical addition for any kitchen that needs extra, organized storage in tight spaces. Adjust the dimensions to suit your gap and bottle sizes, and you’ll have a personalized spice organizer that improves both function and appearance in your cooking area.